We can only sell canvas and covers for 2010 and newer
Aquaport, Chris Craft, Crownline, Ebbtide, Glastron, Larson, Rinker, Scout, SeaSwirl, Starcraft, Triumph, Trophy and Wellcraft
boats with Ameritex® P/N 112350xxx and greater
(from the Black Ameritex® tag from your existing canvas or cover).
Boat Canvas, T-Topless™ & Shadow™ Folding-T-Tops and Flats-Top™ Installation
Visor/Connector/Spray-Shield Installation
Preparing for installation:
Open box(s) and carefully unroll the Visor/Connector curtains.
Do not leave vinyl curtains rolled up in box on end for more than 30 days.
If you cannot install immediately, lay box on side or remove and lay out (with soft cotton cloth betwwen vinyl)
or hang curtains in a safe place.
Do NOT install in less than 75 or 80 degree F temperatures!
Curtains should be hung for about 45 minutes in warm area (80F+) to allow canvas and vinyl to soften and impressions from zippers, etc. to relax.
Check for specific instructions in box.
Attach Visor/Connector/Spray-Shield
Bimini-Top with Zipping Spray-Shield/Visor/Connector:
Loosen rear support poles or straps on Bimini-Top to reduce tension on front of Bimini-Top.
Zip Spray-Shield/Visor/Connector (all 3 sections if 3 piece) to Bimini-Top.
Hard-Top with Track:
Slide Visor/Connector/Spray-Shield (all 3 sections if 3 piece) into track on Hard-Top.
If Visor/Connector/Spray-Shield is a 3-piece unit:
Only zip each zipper 3-6 inches to start, then zip all the way when all zippers are engaged.
Zip in center section first, the port and starboard sections.
Zip the 3 sections together and secure the Velcro flaps.
If our boat has a Vinyl extrusion and grooved track on Top of Windshield:
Grasp Visor/Connector/Spray-Shield at center section, angle with front wedge up and push front half ot "T" edge extrusion into the windshield groove of the walk-thru door (if so equipped).
Shift right/left as necessary to center the Spray-Shield/Visor/Connector in the windshield.
Press back half of the "T" Edge down into the groove unti it snaps into place.
Before installing wings, make sure the walk thru or opening windshield is completely closed/zipped and any Velcro is attached.
Continue to insert the extrusion into groove pressing with the heel of the hand or finger tips all the way out to the corners.
Attach all other Canvas and Curtains:
Connect Side-Curtains, Aft-Curtains, Camper-Top and Camper and any other mating canvas to the top,
Zip all of these pieces to each other carefully.
Pull all canvas tight:
Install on a warm day so the canvas will pull tight easily and not creased or wrinkled,
Hold all canvas pieces in place:
For new pieces which do not yet have snaps:
we use blue 2" wide painters tape (because it holds well, but is easy to remove)
to tape the bottoms of all canvas piece down to the hull,
If your other pieces have snaps, simply snap them in place,
Make sure all canvas is pulled (or snapped) down and looks right,
If your boat (and canvas) has Clip-on Windshield Snaps (photo at right) or Vadney Clips on Windshield:
Measure the center of the Walk-thru, opening window or windshield (mark with tape, pencil or grease pencil).
Align with center of Visor/Connector/Spray-Shield.
Align and install all of your Windshield Snaps or Vadney clips (with 3/8" males snaps on them) on Windshield.
Align and install the center most snaps (through the webbing on the canvas) in your canvas, making sure to keep the canvas as tight as possible.
Install snaps through Visor/Connector:
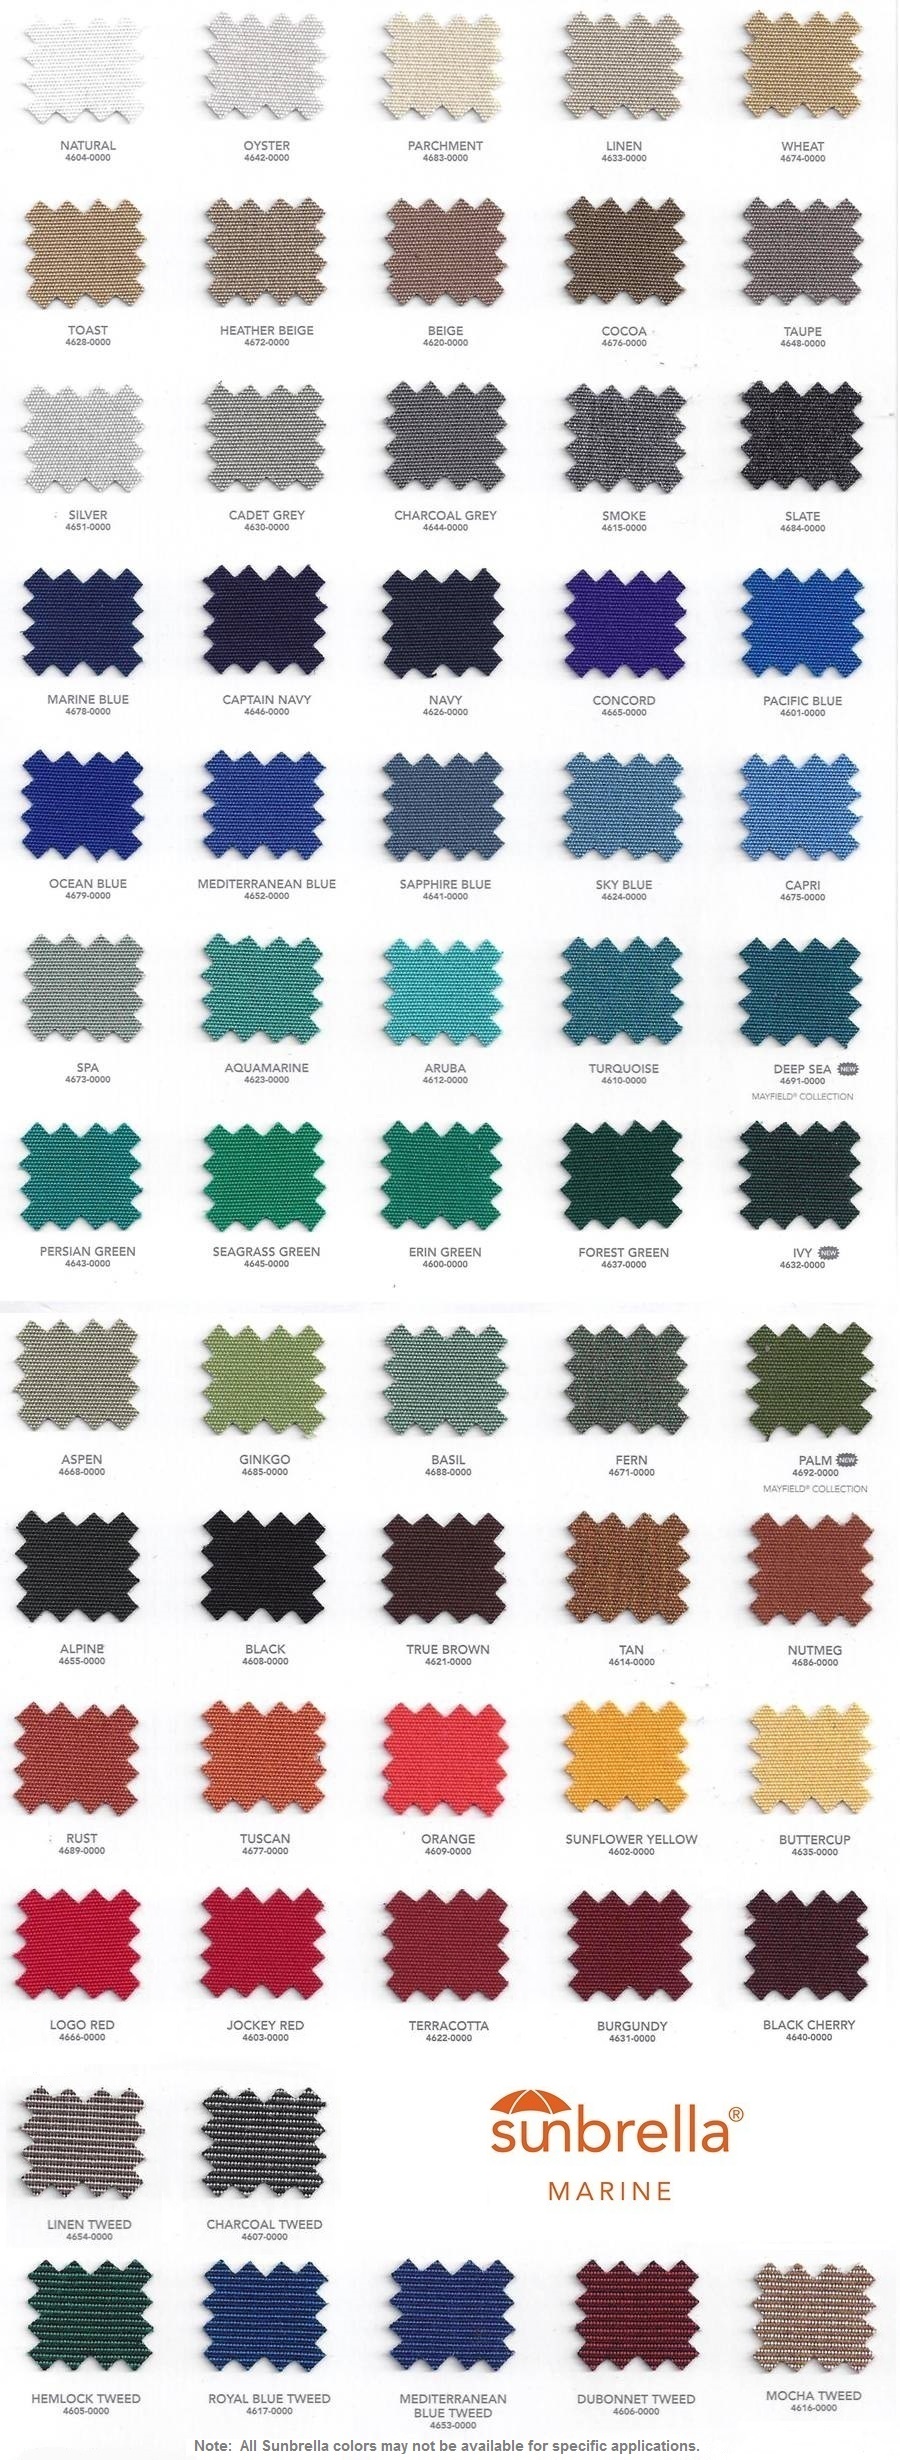
through outer, colored Fabric (typically Sunbrella),
through Webbing strip on back side (typically black),
through Rubber Gasket (if there is one),
crimp snap with Snap-Tool (NOT a punch, die and hammer),
Install standard 3/8" female snaps (provided) in the canvas:
Work from the corners in,
Feel where the snaps are under the canvas,
Use an awl (or ice pick?) to open a small hole in the fabric
(try to simply open the fabric weave, not cutting the fabric),
Open a hole just large enough (about 1/8" diamter) to push the post of the snap through,
Push snap post through fabric:
through outer, colored Fabric (typically Sunbrella),
through Webbing strip on back side (typically black),
through Rubber Gasket (on Bow or Cockpit-Cover, if there is one),
Push the post of the snap through,
Put the female socket part of the snap over the post on the other side,
Use you Snap Tool (Vice-Grip Style, do not use hammer type) to compress the post on the snap.
If the canvas has a rubber gasket that aligns with the snaps on the windshield, install the snaps through the webbing and through the gasket.
Snap the Visor/Connector/Spray-Shield onto the center-most clips, checking tightness and alignment.
Working your way to the outside, carefully align each snap with a windshield snap and install the snaps, again taking care to keep everything tight.
Reposition and tighten any loosened rear support poles or straps.
Side-Curtain Installation
Preparing for installation:
Open box(s) and carefully unroll the curtains.
Do not leave vinyl curtains rolled up in box on end for more than 30 days.
If you cannot install immediately, lay box on side or remove and lay out (with soft cotton cloth betwwen vinyl)
or hang curtains in a safe place.
Do NOT install in less than 75 or 80 degree F temeratures!
Curtains should be hung for about 45 minutes in warm area (80F+) to allow canvas and vinyl to soften and impressions from zippers, etc. to relax.
Check for specific instructions in box.
Attach the top of the Side-Curtain to the top (zip to the side of the Bimini-Top or slide into track on Hard-Top),
Note: Side-Curtain also typically zips to the rear of the front Spray-Shield/Visor/Connector
Attach all other Canvas and Curtains:
Only zip each zipper 3-6 inches to start, then zip all the way when all zippers are engaged.
Zip Side-Curtains, Aft-Curtains, Camper-Top and Camper and any other mating canvas to the top,
Zip all of these pieces to each other carefully.
Pull all canvas tight:
Install on a warm day so the canvas will pull tight easily and not creased or wrinkled,
Hold all canvas pieces in place:
For new pieces which do not yet have snaps
we use blue 2" wide painters tape (because it holds well, but is easy to remove)
to tape the bottoms of all canvas pieces down to the hull,
If your other pieces have snaps, simply snap them in place,
Make sure all canvas is pulled (or snapped) down and looks right,
Align Bimini-Top such that the front Visor/ConnectorSpray-Shield/ and Side-Curtains are aligned with windshield frame and/or boat,
Install track, windshield clips (with snaps) or vadney clips on the windshield, aligned with snaps on Side-Curtain,
If female snaps are present in rear of curtain (not on windshield frame), pull Side-Curtain down tight,
If Male Snaps are not installed in the boat:
Align, mark, drill (or use SNAD male adhesive snaps, photo at right) and install the center-most Male Snap Stud (photo at right),
Install the remaining snap studs at equal intervals of around 4-8" apart,
Install standard 3/8" female snaps (provided) in the canvas:
Work from the corners in,
Feel where the snaps are under the canvas,
Use an awl (or ice pick?) to open a small hole in the fabric
(try to simply open the fabric weave, not cutting the fabric),
Open a hole just large enough (about 1/8" diamter) to push the post of the snap through,
Push snap post through fabric:
through outer, colored Fabric (typically Sunbrella),
through Webbing strip on back side (typically black),
through Rubber Gasket (on Bow or Cockpit-Cover, if there is one),
Push the post of the snap through,
Put the female socket part of the snap over the post on the other side,
Use you Snap Tool (Vice-Grip Style, do not use hammer type) to compress the post on the snap.
Aft-Curtain Installation
Attach the top of the Aft-Curtain to the forward top (zip to the rear of the forward Bimini/Sunshade top or slide into track on Hard-Top),
Note: Aft-Curtain also typically zips to the rear of the Side-Curtains
Attach all other Canvas and Curtains:
Connect Side-Curtains, Aft-Curtains, Camper-Top and Camper and any other mating canvas to the top,
Zip all of these pieces to each other carefully.
Pull all canvas tight:
Install on a warm day so the canvas will pull tight easily and not creased ir wrinkled,
Hold all canvas pieces in place:
For new pieces which do not yet have snaps:
we use blue 2" wide painters tape (because it holds well, but is easy to remove)
to tape the bottoms of all canvas piece down to the hull,
If your other pieces have snaps, simply snap them in place,
Make sure all canvas is pulled (or snapped) down and looks right,
Align the exact center of the Aft-Curtain with the exact center of the boat at the rear outside of the deck,
Tip: Measure to locate center of boat. Railings, ski tow or stern light do not necessarily indicate center of boat
Snap the Aft-Curtain to this male snap and verify alignment,
Pull each lower corner of the Aft-Curtain such that the Aft-Curtain is tight, making sure both sides are even,
If male snaps are not installed in the boat:
Align, mark, drill (or use SNAD male adhesive snaps) and install the center-most male snap stud,
Install the remaining snap studs at equal intervals of around 4-8" apart,
Install standard 3/8" female snaps (provided) in the canvas:
Work from the corners in,
Feel where the snaps are under the canvas,
Use an awl (or ice pick?) to open a small hole in the fabric
(try to simply open the fabric weave, not cutting the fabric),
Open a hole just large enough (about 1/8" diamter) to push the post of the snap through,
Push snap post through fabric:
through outer, colored Fabric (typically Sunbrella),
through Webbing strip on back side (typically black),
through Rubber Gasket (on Bow or Cockpit-Cover, if there is one),
Push the post of the snap through,
Put the female socket part of the snap over the post on the other side,
Use you Snap Tool (Vice-Grip Style, do not use hammer type) to compress the post on the snap.
Bow and Cockpit Cover Installation
Preparing for installation:
Open box(s) and carefully unroll the cover.
Do NOT install in less than 75 or 80 degree F temeratures!
Cover should be hung for about 45 minutes in warm area (80F+) to allow fabric to soften and impressions from zippers, etc. to relax.
Check for specific instructions in box.
It just takes a bit of time and patience to get the bow and cockpit covers properly positioned:
on a warm day,
with Support Pole(s) in place,
align with 2-inch wide blue painters tape (easy to remove and no residue),
install 3/8" stainless steel canvas snaps (provided) using a professional grade (vice-grip style) snap installation tool
as per the instructions below:
Lay the cover across the boat (make sure the Cockpit Cover fits properly over the windshield),
On Over-Windshield Cockpit Covers: Make sure the cover is aligned such that the reinforcing fabric on the back of the Cockpit Cover lays directly over the top egde of the windshield .
If the cover has cutouts for a top or tower, make sure the top or tower goes through the cover and the Velcro® around the frame is tightly closed,
We use 2-inch wide blue painters tape (easy to remove and no residue) to hold the cover in position until we get some snaps installed
Tape one or two edges of the cover to the boat (centered as close as possible),
Someone will need to crawl inside and put the Support-Pole(s) in place at the desired height,
Tape down the rest of the cover, and align to be centered side-to-side and fore-aft to the windshield,
We typically install snaps at two corners first on each side nearest the windshield, aligning over the male snap-studs mounted in the hull,
Check fit again, and pull tight at the other two cornerers (making sure anything passing therough cutouts remains aligned),
Install snaps at the other two corners,
Install snaps through cover:
through outer, colored Fabric (typically Sunbrella),
through Webbing strip on back side (typically black),
through Rubber Gasket (if there is one),
crimp snap with Snap-Tool (NOT a punch, die and hammer),
Check fit again, and begin installing snaps between the corners until you are finished.
Note: If male snaps are not installed in the boat:
Align, mark, drill (or use SNAD(r) male adhesive snaps) and install the corners male snap studs first,
Install the remaining snap studs at equal intervals of around 4-8" apart,
Install standard 3/8" female snaps (provided) in the canvas:
Work from the corners in,
Feel where the snaps are under the canvas,
Use an awl (or ice pick?) to open a small hole in the fabric
(try to simply open the fabric weave, not cutting the fabric),
Open a hole just large enough (about 1/8" diamter) to push the post of the snap through,
Push snap post through fabric:
through outer, colored Fabric (typically Sunbrella),
through Webbing strip on back side (typically black),
through Rubber Gasket (on Bow or Cockpit-Cover, if there is one),
Push the post of the snap through,
Put the female socket part of the snap over the post on the other side,
Use you Snap Tool (Vice-Grip Style, do not use hammer type) to compress the post on the snap.
Snap-On Pontoon (Playpen) Cover Installation
Preparing for installation:
Open box(s) and carefully unroll the cover.
Do NOT install in less than 75 or 80 degree F temeratures!
Cover should be hung for about 45 minutes in warm area (80F+) to allow fabric to soften and impressions from zippers, etc. to relax.
Check for specific instructions in box.
It just takes a bit of time and patience to get the ponton cover properly positioned:
on a warm day,
with Support Pole(s) in place,
align with 2-inch wide blue painters tape (easy to remove and no residue),
install 3/8" stainless steel canvas snaps (provided) using a professional grade (vice-grip style) snap installation tool
as per the instructions below:
Lay the cover across the pontoon boat's raised Playpen (make sure the cover fits properly over the windshield if any),
If the cover has cutouts for a Bimini-Top, make sure the top goes through the cover and the Velcro® around the frame is tightly closed,
We use 2-inch wide blue painters tape (easy to remove and no residue) to hold the cover in position until we get some snaps installed
Tape one or two edges of the cover to the boat (centered as close as possible),
Someone will need to crawl inside and put the Support-Poles in place at the desired height,
Tape down the rest of the cover, and align to be centered side-to-side and fore-aft to the windshield,
We typically install snaps at two corners first on each side nearest the windshield, aligning over the male snap-studs mounted in the hull,
Check fit again, and pull tight at the other two corners (making sure anything passing therough cutouts remains aligned),
Install snaps at the other two corners,
Install snaps through cover:
through outer, colored Fabric (typically Sunbrella),
through Webbing strip on back side (typically black),
through Rubber Gasket (if there is one),
crimp snap with Snap-Tool (NOT a punch, die and hammer),
Check fit again, and begin installing snaps between the corners until you are finished.
Note: If male snaps are not installed in the boat:
Align, mark, drill (or use SNAD(r) male adhesive snaps) and install the corners male snap studs first,
Install the remaining snap studs at equal intervals of around 4-8" apart,
Install standard 3/8" female snaps (provided) in the canvas:
Work from the corners in,
Feel where the snaps are under the canvas,
Use an awl (or ice pick?) to open a small hole in the fabric
(try to simply open the fabric weave, not cutting the fabric),
Open a hole just large enough (about 1/8" diamter) to push the post of the snap through,
Push snap post through fabric:
through outer, colored Fabric (typically Sunbrella),
through Webbing strip on back side (typically black),
through Rubber Gasket (on Bow or Cockpit-Cover, if there is one),
Push the post of the snap through,
Put the female socket part of the snap over the post on the other side,
Use you Snap Tool (Vice-Grip Style, do not use hammer type) to compress the post on the snap.
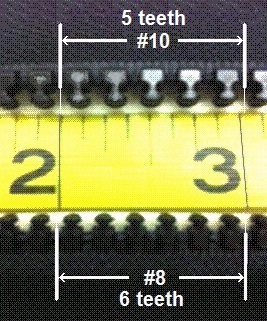
Factory Original Equipment Manufacturer (OEM) Canvas Zippers
When replacing factory original canvas,
Check and Verify that your existing and mating canvas piece(s):
have Factory OEM #8 zippers (6 teeth/inch, 8mm zipper tooth height),
NOT #10 (5 teeth/inch, 10mm zipper tooth height) which are After-Market zippers,
have Great-Lakes, Ameritex, Taylor-Made, Atlantic Coats, Boatswains Locker or Dowco
labels on the tags sewn into the edegs of the canvas.
These tags may be been removed or faded over the years,
so you may have to check a Boot-Cover, Bow-Cover or Cockpit-Cover for these tags,
You are responsible for checking to make sure your existing canvas is Factory OEM,
and there are no returns, refunds or cancellations
as all OEM canvas is made specifically to your order in the color you have selected.
How to install snaps on canvas
Canvas Snap Installation Tool Options :
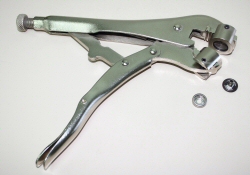
Time Saver™ Button (snap) Fastening kit - Vice Plier Attachments
... $5 to $40
Great Lakes™
Snap Installation Tool
... $56.82 , We are not selling this online as of 2024
Complete Vice Plier with installation dies welded to frame,
Useful for installing many snaps,
Simply align the snap, create small hole with ice pick or awl,
put snap in place and
crimp with tool,
This tool is the same concept as simply adding the "Time Saver" snap die attachments
above to your own vice grips,
except these dies are welded to the vice grips here,
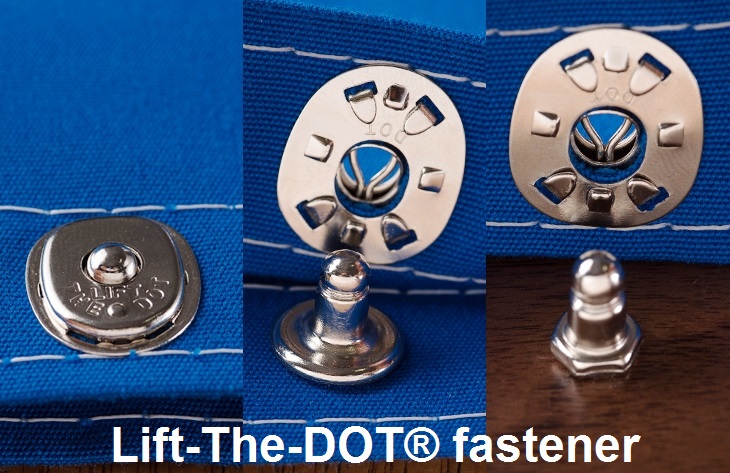
Installation of Lift-The-DOT® fasteners is a bit more manual than installing other fasteners.
Holes can be cut with a razor blade and then the prongs can be folded over with the Prong Bending Tool
for Lift-the-DOT® fasteners (#120445) or a screwdriver.
Special hole cutters and other tools make installation much easier.
These tools are available from SailRite:
Lift-The-DOT® Hand Punch (#100972) cuts holes for 2-Prong Studs.
Lift-The-DOT® Hole Cutter (#110012) cuts the center hole and slits for Lift-The-DOT® Sockets.
Lift-The-DOT® Deluxe Hand Punch (#100695) cuts the center hole and slits for the socket in one squeeze.
Pres-N-Snap® Tool (#109011) with additional die set (#106397) installs the Eyelet-Type Base Stud only.
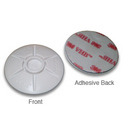
YKK® SNAD™ Installation
Attach and align as much of the canvas as possible to the boat, possibly taping canvas in place,
Clean surface with alcohol swipe (included) or mild solvent (YKK® Primer 94™ may be used for best adhesion),
Let surface air dry or dry with lint free cloth,
Join SNAD with mating snap on canvas for perfect alignment,
Remove liner from back of SNAD and be careful to avoid touching exposed adhesive surface,
Carefully locate where you want the canvas/snap/SNAD,
Press down firmly (15lbs) to secure to surface. Press all around SNAD, including the center,
Snap Canvas to SNAD and leave in place, move to next snap location and repeat ...
Note: Ideal application temperature is 60°F to 100°F (16°C to 38° C) and the bond strength will continue to increase and approaches the ultimate strength after 72 hours at 60°F (16°C).
Your Sunbrella®, Weblon® or Stamoid® canvas will NOT shrink ...
In the past canvas was often made of cotton or poly/cotton "Duck" fabric
which would shrink over time.
All of the canvas we sell is dimensionally stable and does not shrink.
Sunbrella®, in fact,
will stretch a very slight amount over time,
so it is important to install it as tightly as possible.
There is no need to leave the canvas loose to account for future shrinking.
Replacing Existing Canvas (No Snaps in Canvas OR Snaps already in place on T-Top)
If you are replacing existing canvas and have snaps installed on the T-Top frame,
it is advisable to install the snaps in the canvas yourself for perfect alignment.
We install (or provide) 5/8" OD Nickel Plated Brass snaps with a 1/4" barrel.
Installing snaps yourself will require a snap installation tool.
We offer a tool, and recommend the tools below.
New Canvas Installation (NO Snaps on T-Top) :
If you are installing canvas on the T-Top for the first time,
there will probably be no snaps installed on the T-Top frame.
To install Male Snap-Screws on the T-Top's aluminum frame,
you will need to carefully:
align (see installation steps below),
mark (use a sharp pencil and double-check),
drill (sharp 7/64" bit, confirm before drilling),
apply Tef-Gel® sealant (to prevent galvanic corrosion) and
install (screw in with medium size Phillips screwdriver) the
Stainless Steel Male Snap-Screws in these holes.
T-Top Spray-Shield Installation Steps:
Click the drawing at right for a larger view,
PRO Tip:
If the canvas is stiff or wrinkled from storage or shipping,
allow it to "Relax" in a warm place before installation,
Keep the front window zipped closed during installation,
Start installing the canvas from the
Center->Out and Top->Down at the Corners First :
Locate the True-Center of the T-Top Tower
(and the canvas)
by measuring
Outside-to-Outside along the front of the
T-Top Tower (and the canvas):
at the top,
as well as at the level (waist level)
where the bottom of ths spray-shield will mount,
Hold the canvas centered at the top,
wrap the the Side "Wing" panels around the T-Top Tower frame
and then check that everything
lines up on the top, bottom and sides.
Carefully mark and install the Top/Center Snap(s)
labelled [A1] in the picture at right,
Mark and install the Bottom/Center Snap(s)
labelled [A2] in the picture at right,
With the canvas snapped to the frame using
snaps [A1] and [A2],
wrap the side "Wings" around the T-Top Tower and affix Velcro around the top
of the T-Top pipe [B],
Pull the Right side of the Front Panel tight by pulling
Up and Out at top [C1] and
Down and Around frame at Bottom [C2], then install Snaps:
at Top/Front corner At [C1] and
at Bottom/Front corner [C2],
Repeat step C (C1 and C2) above for the Left side of the front panel,
Pull the Right Side "Wing" panel tight by pulling
Up and Back at Top [D1] and
Down and Back at Bottom [D2], then install Snaps:
at Top/Rear corner [D1] and
at Bottom/Rear corner [D2],
Repeat step D (D1 and D2) above for the Left Side "Wing" panel,
With the front and side panels pulled "snug" tight,
mark and install the remaining snaps
(between the corner snaps installed above)
at the top, sides and bottom.
Note: A Snap Installation Tool is only required for
canvas provided without the snaps installed ...
How to install snaps on canvas
Canvas Snap Installation Tool Options :
Time Saver™ Button (snap) Fastening kit - Vice Plier Attachments
... $5 to $40
Great Lakes™
Snap Installation Tool
... $56.82 , We are not selling this online as of 2024
Complete Vice Plier with installation dies welded to frame,
Useful for installing many snaps,
Simply align the snap, create small hole with ice pick or awl,
put snap in place and
crimp with tool,
This tool is the same concept as simply adding the "Time Saver" snap die attachments
above to your own vice grips,
except these dies are welded to the vice grips here,
Installation of Lift-The-DOT® fasteners is a bit more manual than installing other fasteners.
Holes can be cut with a razor blade and then the prongs can be folded over with the Prong Bending Tool
for Lift-the-DOT® fasteners (#120445) or a screwdriver.
Special hole cutters and other tools make installation much easier.
These tools are available from SailRite:
Lift-The-DOT® Hand Punch (#100972) cuts holes for 2-Prong Studs.
Lift-The-DOT® Hole Cutter (#110012) cuts the center hole and slits for Lift-The-DOT® Sockets.
Lift-The-DOT® Deluxe Hand Punch (#100695) cuts the center hole and slits for the socket in one squeeze.
Pres-N-Snap® Tool (#109011) with additional die set (#106397) installs the Eyelet-Type Base Stud only.
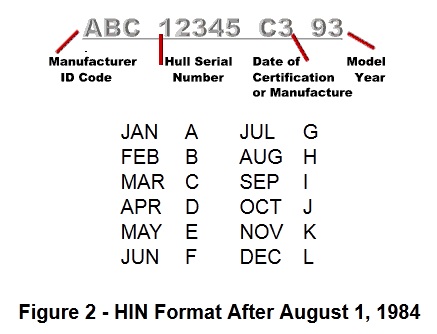
Verifying your Boat:Hull Identification Numbers (HIN) AFTER Aug 01, 1984 ...
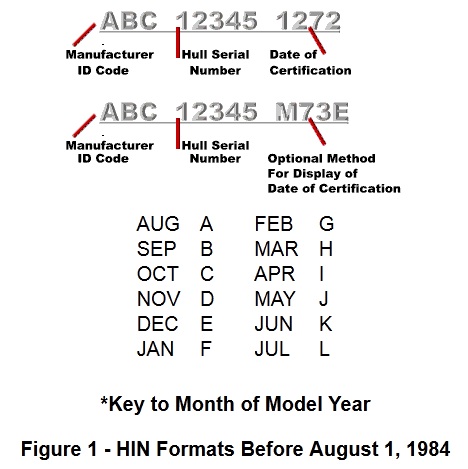
Hull Identification Numbers (HIN) BEFORE Aug 01, 1984 ...
Each of our boat manufacturers' canvas pages
have Photos of the Factory OEM T-Tops, Hard-Top, Bimini-Tops, Canvas, etc. at the
bottom of the page for verification
(Sea Hunt® Photos for example).
Please compare your boat against these photos to insure you have the
Original-Equipment (OEM) Top frame from the Factory
(some dealers, like Chatlee in NC and Ed's Marine Superstoe in VA,
for example,
install their own, after-market T-Tops).
Our Factory OEM canvas
does not fit after-market Tops!
Boston Whaler®, Sea Ray® and Grady White® do NOT allow
dealers to install their own, after-market tops on new boats,
so these are typically Factory OEM,
unless an owner installed their own top.
We sell at a discount (and without 6-12% Sales Tax) versus the local dealers
since we "make-to-order" (Just-In-Time = JIT)
using our inventory of 1,000's of patterns
(no need to carry inventory)
and thus our overhead is lower.
Unfortunately, agreements with boat manufacturers prevent us from selling the current (last 2 model years)
factory-original (OEM) production canvas, frames and covers direct to the public.
Some photos show optional items mounted on standard products.
Descriptive, typographical or photographical errors are subject to correction.
18.119.105.239 ,
Lace your T-Top Canvas
Lace Replacement T-Top Canvas
Lacing your T-Top Canvas
Lacing Replacement T-Top Canvas
Ontario British Columbia BC Alberta Newfoundland Saskatchewan Manitoba Quebec New Brunswick Novia Scotia Labrador
ALABAMA AL ARIZONA AZ ARKANSAS AR CALIFORNIA CA COLORADO CO CONNECTICUT CT
DELAWARE DE DISTRICT OF COLUMBIA DC FLORIDA FL GEORGIA GA
IDAHO ID ILLINOIS IL INDIANA IN IOWA IA KANSAS KS KENTUCKY KY LOUISIANA LA
MAINE ME MARYLAND MD MASSACHUSETTS MA MICHIGAN MI
MINNESOTA MN MISSISSIPPI MS MISSOURI MO MONTANA MT
NEBRASKA NE NEVADA NV NEW HAMPSHIRE NH NEW JERSEY NJ
NEW MEXICO NM NEW YORK NY NORTH CAROLINA NC NORTH DAKOTA ND
OHIO OH OKLAHOMA OK OREGON OR PENNSYLVANIA PA
RHODE ISLAND RI SOUTH CAROLINA SC SOUTH DAKOTA SD
TENNESSEE TN TEXAS TX UTAH UT VERMONT VT VIRGINIA VA
WASHINGTON WA WEST VIRGINIA WV WISCONSIN WI WYOMING WY
T-Topless-2™ & Montauk-T-Topless-2™ Installation | Overview of installation steps.

3/28/24 Status:
We can only sell canvas and covers for 2010 and newer
Aquaport, Chris Craft, Crownline, Ebbtide, Glastron, Larson, Rinker, Scout, SeaSwirl, Starcraft, Triumph, Trophy and Wellcraft
boats with Ameritex® P/N 112350xxx and greater
(from the Black Ameritex® tag from your existing canvas or cover).
Note - A complete, illustrated "Installation Guide" will be sent with your top.
Carefully unpack your T-Topless™/Montauk-T-Topless™ (20 minutes):
Do NOT cut through the box,
as the Sunbrella® canvas is packed in the box!
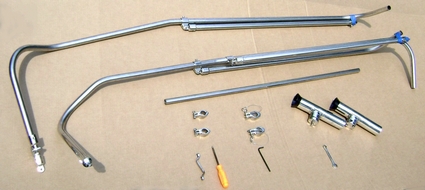
T-Topless and components
(instructions, light lens, clamps & wiring harness)
in box.
Install the T-Toplesss™/Montauk-T-Topless™ (30-45 minutes):
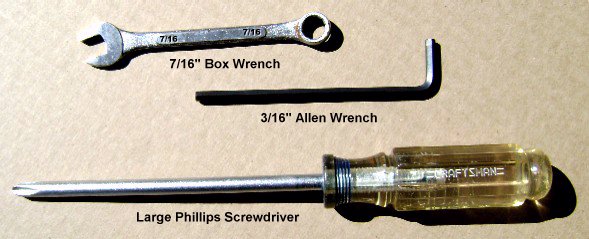
You'll need a
5/6" Hex Wrench,
a Medium Phillips Screwdriver and
a 7/16" Box End Wrench
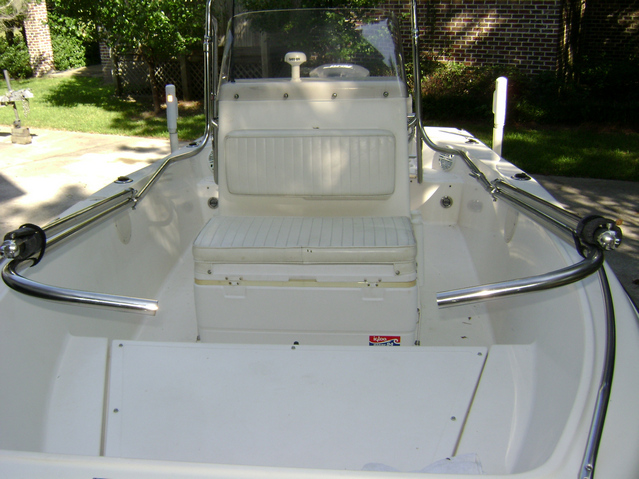
Lay top upside down on padded cooler in front of boat,
with legs facing up, such that the leg's lower pivots are near the top of
the windshield grab rails,
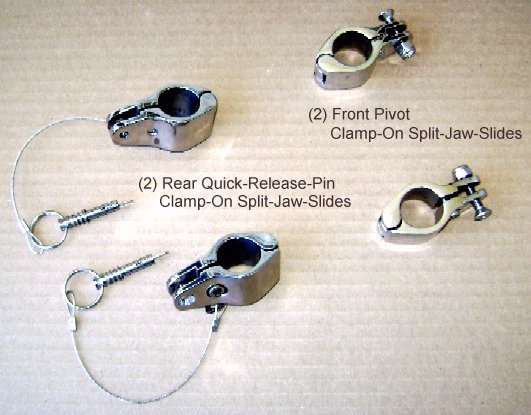
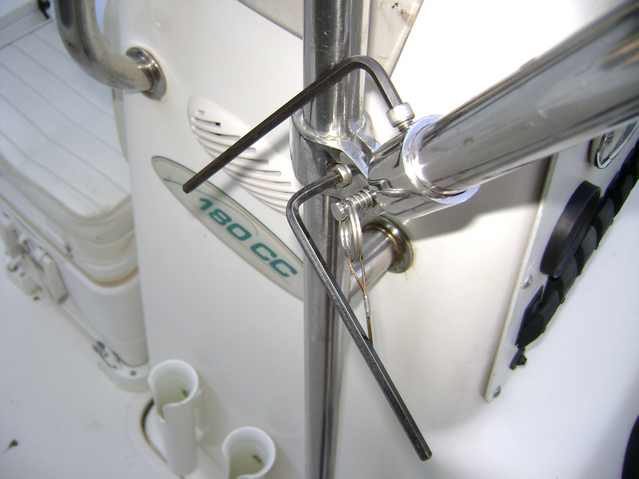
Install front clamshell "Split Jaw Slides" on windshield grab rails,
approx, 50-55" above floor using 3/16" hex wrench,
Align front legs into pivot point on these Split Jaw Slides
and insert 1/4-20 bolts and nuts using Phillips screwdriver
and 7/16" box end wrench,
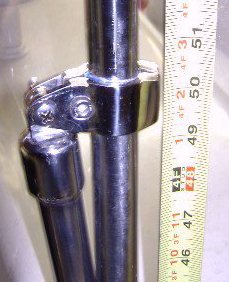
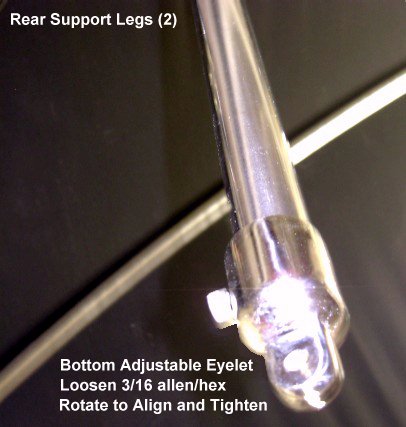
Install rear legs pivots on rear windshield grab rails,
or deck-hinge fittings attached to rear of console,
Rotate top up carefully and align rear legs with these fittings,
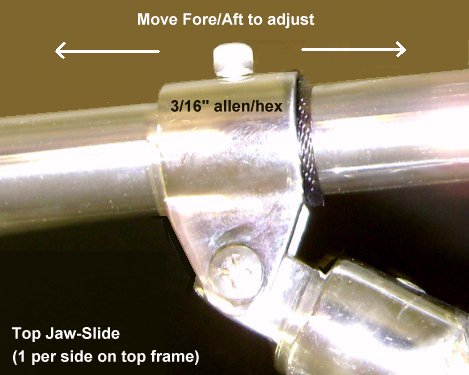
Adjust jaw-slides on frame at top of Rear-Legs fore/aft and
clamp-on split-jaw-slides at bottom of Rear-Legs up/down
in order to level the top and
produce a stable, wide-based "A" shape.
Carefully unpack your T-Topless-2™/Montauk-T-Topless-2™ (20 minutes):
Do NOT cut through the box,
as the Sunbrella® canvas is packed in the box!
T-Topless-2 and components
(instructions, light lens, clamps & wiring harness)
in box.
Install the T-Toplesss-2™/Montauk-T-Topless-2™ (30-45 minutes):
You'll need a
5/6" Hex Wrench,
a Medium Phillips Screwdriver and
a 7/16" Box End Wrench
Lay top upside down on padded cooler in front of boat,
with legs facing up, such that the leg's lower pivots are near the top of
the windshield grab rails,
Install front clamshell "Split Jaw Slides" on windshield grab rails,
approx, 50-55" above floor using 3/16" hex wrench,
Align front legs into pivot point on these Split Jaw Slides
and insert 1/4-20 bolts and nuts using Phillips screwdriver
and 7/16" box end wrench,
Install rear legs pivots on rear windshield grab rails,
or deck-hinge fittings attached to rear of console,
Rotate top up carefully and align rear legs with these fittings,
Adjust jaw-slides on frame at top of Rear-Legs fore/aft and
clamp-on split-jaw-slides at bottom of Rear-Legs up/down
in order to level the top and
produce a stable, wide-based "A" shape.
How to lace canvas on your T-Top
Lace canvas on top
Lace canvas on T-top
Lace canvas on Shadow
Lace Sunbrella on T-Top
Lace Sunbrella on Shadow T-Top
Lace a boat T-top cover
Lacing canvas on top
Lacing canvas on T-top
Lacing canvas on Shadow
Lacing Sunbrella on T-Top
Lacing Sunbrella on Shadow T-Top
Lacing a boat T-top cover
Lace the Canvas (30-40 minutes):
If the top is off the boat, position the top so you can reach both sides easily,
by positioning the top:
hanging in the air vertically from one end or a side,
in place on the boat (working over your head can be tiring however), or
with the end of the top on a table so you can reach underneath.
Attach the canvas loosely using 6 to 8 "zip-ties" pulled through
grommets near the corners and around frame.
Once lined up, tighten, but not too tight.
Start in the center at the front (if possible)
(Front/Middle on most T-Tops, T-Topless™, Montauk-T-Topless™ & Flats-Top™;
Rear/Middle on the Shadow™ & Montauk-Shadow™),
You want to end up with the lacing running under the canvas
between grommets in order to turn the edges of the canvas down to shed water,
Lace the canvas to the frame
(important to reverse over/under from left to right side to avoid kinking):
Lace to the Left:
Start lacing through the TOP of 1st grommet,
Run lacing under canvas and up through the next grommet to the Left,
Run lacing UNDER frame tubing and OVER the top of the frame tubing,
Run lacing back through the TOP of same grommet,
Repeat at the next grommet to the Left until finished,
Lace to the Right (reverse under/over bar sequence):
Start lacing through the TOP of 1st grommet at the center,
Run lacing under canvas and up through the next grommet to the Right,
Run lacing OVER frame tubing and UNDER the top of the frame tubing,
Run lacing back through the TOP of same grommet,
Repeat at the next grommet to the Right until finished.
Pull all canvas lacing tight,
Adjust lacing to center the canvas in the frame side-to-side and fore-and-aft,
Pull all canvas lacing tight, but do NOT over-tighten!
The canvas should have a snug fit
with the edge having a smooth straight appearance.
Do not over-tighten to the point of "smiley's" between grommets
(this may void your warranty),
Loop the "tag ends" through the last eyelet at each end 2 or 3 times,
Tie the ends in a bow, then tie the loops of the bow in a square knot,
Cut the loose "tag ends" of the lacing to about 3" and burn the ends to prevent unravelling.
Weave these "tag ends" into the lacing for a finished look.
Square Lacing shown on Shadow™ Folding T-Top
Install Light Wiring (15-45 minutes):
Locate or drill a hole through the console to pull
the jacketed wiring pig-tail (included) through to inside your console,
Pull the wiring pig-tail through,
Behind your dash,
locate the wire that feeds the Anchor (ANC) and
Navigation (NAV) white light
(typically Grey or Blue with a Black Stripe)
and attach the Red (+) wire to it, ref:
American Boat and Yacht Council Wiring Standard Colors & Use,
Attach the Black (-) wire to ground (possibly the tachometer center bolt),
Connect the top's wires to the lead through the splash-proof pin-connectors
already attached to the the cables,
Zip tie the jacketed wires along the windshield grab rail with zip ties (included)
and trim them flush,
providing some room at the top to fold the top down without pinching the wires.
Verifying your Boat:Hull Identification Numbers (HIN) AFTER Aug 01, 1984 ...
Hull Identification Numbers (HIN) BEFORE Aug 01, 1984 ...
Each of our boat manufacturers' canvas pages
have Photos of the Factory OEM T-Tops, Hard-Top, Bimini-Tops, Canvas, etc. at the
bottom of the page for verification
(Sea Hunt® Photos for example).
Please compare your boat against these photos to insure you have the
Original-Equipment (OEM) Top frame from the Factory
(some dealers, like Chatlee in NC and Ed's Marine Superstoe in VA,
for example,
install their own, after-market T-Tops).
Our Factory OEM canvas
does not fit after-market Tops!
Boston Whaler®, Sea Ray® and Grady White® do NOT allow
dealers to install their own, after-market tops on new boats,
so these are typically Factory OEM,
unless an owner installed their own top.
We sell at a discount (and without 6-12% Sales Tax) versus the local dealers
since we "make-to-order" (Just-In-Time = JIT)
using our inventory of 1,000's of patterns
(no need to carry inventory)
and thus our overhead is lower.
Unfortunately, agreements with boat manufacturers prevent us from selling the current (last 2 model years)
factory-original (OEM) production canvas, frames and covers direct to the public.
Some photos show optional items mounted on standard products.
Descriptive, typographical or photographical errors are subject to correction.
18.119.105.239 ,
Install your T-Toples in an hour
How to install your T-Topless
Its easy to install your T-Topless
Ontario British Columbia BC Alberta Newfoundland Saskatchewan Manitoba Quebec New Brunswick Novia Scotia Labrador
ALABAMA AL ARIZONA AZ ARKANSAS AR CALIFORNIA CA COLORADO CO CONNECTICUT CT
DELAWARE DE DISTRICT OF COLUMBIA DC FLORIDA FL GEORGIA GA
IDAHO ID ILLINOIS IL INDIANA IN IOWA IA KANSAS KS KENTUCKY KY LOUISIANA LA
MAINE ME MARYLAND MD MASSACHUSETTS MA MICHIGAN MI
MINNESOTA MN MISSISSIPPI MS MISSOURI MO MONTANA MT
NEBRASKA NE NEVADA NV NEW HAMPSHIRE NH NEW JERSEY NJ
NEW MEXICO NM NEW YORK NY NORTH CAROLINA NC NORTH DAKOTA ND
OHIO OH OKLAHOMA OK OREGON OR PENNSYLVANIA PA
RHODE ISLAND RI SOUTH CAROLINA SC SOUTH DAKOTA SD
TENNESSEE TN TEXAS TX UTAH UT VERMONT VT VIRGINIA VA
WASHINGTON WA WEST VIRGINIA WV WISCONSIN WI WYOMING WY
Shadow™ & Montauk-Shadow™ Installation | Overview of installation steps.

3/28/24 Status:
We can only sell canvas and covers for 2010 and newer
Aquaport, Chris Craft, Crownline, Ebbtide, Glastron, Larson, Rinker, Scout, SeaSwirl, Starcraft, Triumph, Trophy and Wellcraft
boats with Ameritex® P/N 112350xxx and greater
(from the Black Ameritex® tag from your existing canvas or cover).
Note - A complete, illustrated "Installation Guide" will be sent with your top.
Install the Frame (20 minutes):
Install Front (2) and Rear (2) Split-Jaw-Slide clamps on windshield grab rails
Mount the Starboard side Frame (upside down in the front of the boat),
to the front Split-Jaw-Slide pivot point.
Mount the Port side Frame the same way,
Install the Rear-Legs to each frame at the Top-Slide
(shorter legs come factory installed),
Rotate the top up (with a friend)
and connect the Rear-Legs to the Rear-Leg-Mounts installed earlier,
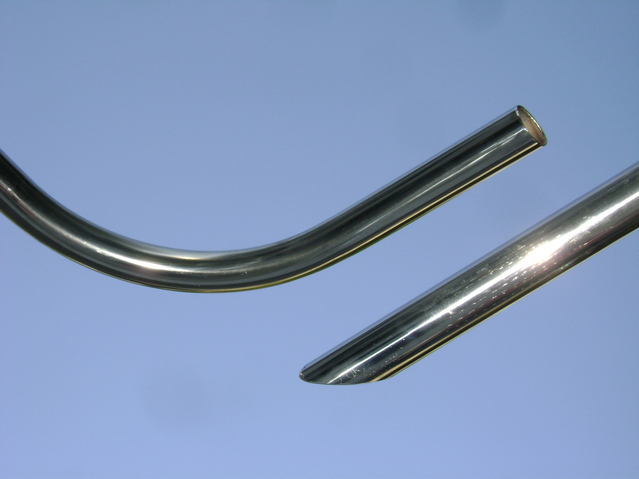
It may be necessary to shorten the Rear-Legs
by removing their end fittings and cutting the appropriate amount of
tubing off of each,
Assemble the Port side Frame to the Starboard side by sliding the
7/8"dia. Curved Rear-Cross-Bar firmly into the rear of each side,
Adjust height and angles to suit,
ensuring a good, wide based triangle is formed between
the front and rear grab rail mounting points
(put them as far apart as possible).
How to lace canvas on your T-Top
Lace canvas on top
Lace canvas on T-top
Lace canvas on Shadow
Lace Sunbrella on T-Top
Lace Sunbrella on Shadow T-Top
Lace a boat T-top cover
Lacing canvas on top
Lacing canvas on T-top
Lacing canvas on Shadow
Lacing Sunbrella on T-Top
Lacing Sunbrella on Shadow T-Top
Lacing a boat T-top cover
Lace the Canvas (30-40 minutes):
If the top is off the boat, position the top so you can reach both sides easily,
by positioning the top:
hanging in the air vertically from one end or a side,
in place on the boat (working over your head can be tiring however), or
with the end of the top on a table so you can reach underneath.
Attach the canvas loosely using 6 to 8 "zip-ties" pulled through
grommets near the corners and around frame.
Once lined up, tighten, but not too tight.
Start in the center at the front (if possible)
(Front/Middle on most T-Tops, T-Topless™, Montauk-T-Topless™ & Flats-Top™;
Rear/Middle on the Shadow™ & Montauk-Shadow™),
You want to end up with the lacing running under the canvas
between grommets in order to turn the edges of the canvas down to shed water,
Lace the canvas to the frame
(important to reverse over/under from left to right side to avoid kinking):
Lace to the Left:
Start lacing through the TOP of 1st grommet,
Run lacing under canvas and up through the next grommet to the Left,
Run lacing UNDER frame tubing and OVER the top of the frame tubing,
Run lacing back through the TOP of same grommet,
Repeat at the next grommet to the Left until finished,
Lace to the Right (reverse under/over bar sequence):
Start lacing through the TOP of 1st grommet at the center,
Run lacing under canvas and up through the next grommet to the Right,
Run lacing OVER frame tubing and UNDER the top of the frame tubing,
Run lacing back through the TOP of same grommet,
Repeat at the next grommet to the Right until finished.
Pull all canvas lacing tight,
Adjust lacing to center the canvas in the frame side-to-side and fore-and-aft,
Pull all canvas lacing tight, but do NOT over-tighten!
The canvas should have a snug fit
with the edge having a smooth straight appearance.
Do not over-tighten to the point of "smiley's" between grommets
(this may void your warranty),
Loop the "tag ends" through the last eyelet at each end 2 or 3 times,
Tie the ends in a bow, then tie the loops of the bow in a square knot,
Cut the loose "tag ends" of the lacing to about 3" and burn the ends to prevent unravelling.
Weave these "tag ends" into the lacing for a finished look.
Square Lacing shown on Shadow™ Folding T-Top
Tighten the Canvas (10 minutes):
The Shadow gets its strength by stretching the canvas tightly across the front,
Tighten the canvas from back to front, but do NOT over-tighten!
The canvas should bave a snug fit
with the edge having a smooth straight appearance.
Do not over-tighten to the point of "smiley's" between grommets,
Make sure the lacing goes through the front grommet
and around the tubing 2-3 times on the front grommet on each side,
Tie each end in a secure square knot.
Install Optional Stabilizer (10 minutes):
Decide if the stabilizer wil be mounted with the high side on the port or the starboad side,
Loosely mount a split-jaw-slide rail clamp high on one side (port or starboard frame)
and low above the windshield grab rail on the frame on the opposite side's frame,
Install the Stabilizer bar to the split-jaw-slide clamp on the high side and adjust so it
come down and meets the other split-jaw-slide clamp on the opposite, low side,
Verifying your Boat:Hull Identification Numbers (HIN) AFTER Aug 01, 1984 ...
Hull Identification Numbers (HIN) BEFORE Aug 01, 1984 ...
Each of our boat manufacturers' canvas pages
have Photos of the Factory OEM T-Tops, Hard-Top, Bimini-Tops, Canvas, etc. at the
bottom of the page for verification
(Sea Hunt® Photos for example).
Please compare your boat against these photos to insure you have the
Original-Equipment (OEM) Top frame from the Factory
(some dealers, like Chatlee in NC and Ed's Marine Superstoe in VA,
for example,
install their own, after-market T-Tops).
Our Factory OEM canvas
does not fit after-market Tops!
Boston Whaler®, Sea Ray® and Grady White® do NOT allow
dealers to install their own, after-market tops on new boats,
so these are typically Factory OEM,
unless an owner installed their own top.
We sell at a discount (and without 6-12% Sales Tax) versus the local dealers
since we "make-to-order" (Just-In-Time = JIT)
using our inventory of 1,000's of patterns
(no need to carry inventory)
and thus our overhead is lower.
Unfortunately, agreements with boat manufacturers prevent us from selling the current (last 2 model years)
factory-original (OEM) production canvas, frames and covers direct to the public.
Some photos show optional items mounted on standard products.
Descriptive, typographical or photographical errors are subject to correction.
18.119.105.239 ,
Install your T-Toples in an hour
How to install your T-Topless
Its easy to install your T-Topless
Ontario British Columbia BC Alberta Newfoundland Saskatchewan Manitoba Quebec New Brunswick Novia Scotia Labrador
ALABAMA AL ARIZONA AZ ARKANSAS AR CALIFORNIA CA COLORADO CO CONNECTICUT CT
DELAWARE DE DISTRICT OF COLUMBIA DC FLORIDA FL GEORGIA GA
IDAHO ID ILLINOIS IL INDIANA IN IOWA IA KANSAS KS KENTUCKY KY LOUISIANA LA
MAINE ME MARYLAND MD MASSACHUSETTS MA MICHIGAN MI
MINNESOTA MN MISSISSIPPI MS MISSOURI MO MONTANA MT
NEBRASKA NE NEVADA NV NEW HAMPSHIRE NH NEW JERSEY NJ
NEW MEXICO NM NEW YORK NY NORTH CAROLINA NC NORTH DAKOTA ND
OHIO OH OKLAHOMA OK OREGON OR PENNSYLVANIA PA
RHODE ISLAND RI SOUTH CAROLINA SC SOUTH DAKOTA SD
TENNESSEE TN TEXAS TX UTAH UT VERMONT VT VIRGINIA VA
WASHINGTON WA WEST VIRGINIA WV WISCONSIN WI WYOMING WY
Flats-Top™ Installation | Overview of installation steps.

3/28/24 Status:
We can only sell canvas and covers for 2010 and newer
Aquaport, Chris Craft, Crownline, Ebbtide, Glastron, Larson, Rinker, Scout, SeaSwirl, Starcraft, Triumph, Trophy and Wellcraft
boats with Ameritex® P/N 112350xxx and greater
(from the Black Ameritex® tag from your existing canvas or cover).
Note - A complete, illustrated "Installation Guide" will be sent with your top.
How to lace canvas on your T-Top
Lace canvas on top
Lace canvas on T-top
Lace canvas on Shadow
Lace Sunbrella on T-Top
Lace Sunbrella on Shadow T-Top
Lace a boat T-top cover
Lacing canvas on top
Lacing canvas on T-top
Lacing canvas on Shadow
Lacing Sunbrella on T-Top
Lacing Sunbrella on Shadow T-Top
Lacing a boat T-top cover
Lace the Canvas (30-40 minutes):
If the top is off the boat, position the top so you can reach both sides easily,
by positioning the top:
hanging in the air vertically from one end or a side,
in place on the boat (working over your head can be tiring however), or
with the end of the top on a table so you can reach underneath.
Attach the canvas loosely using 6 to 8 "zip-ties" pulled through
grommets near the corners and around frame.
Once lined up, tighten, but not too tight.
Start in the center at the front (if possible)
(Front/Middle on most T-Tops, T-Topless™, Montauk-T-Topless™ & Flats-Top™;
Rear/Middle on the Shadow™ & Montauk-Shadow™),
You want to end up with the lacing running under the canvas
between grommets in order to turn the edges of the canvas down to shed water,
Lace the canvas to the frame
(important to reverse over/under from left to right side to avoid kinking):
Lace to the Left:
Start lacing through the TOP of 1st grommet,
Run lacing under canvas and up through the next grommet to the Left,
Run lacing UNDER frame tubing and OVER the top of the frame tubing,
Run lacing back through the TOP of same grommet,
Repeat at the next grommet to the Left until finished,
Lace to the Right (reverse under/over bar sequence):
Start lacing through the TOP of 1st grommet at the center,
Run lacing under canvas and up through the next grommet to the Right,
Run lacing OVER frame tubing and UNDER the top of the frame tubing,
Run lacing back through the TOP of same grommet,
Repeat at the next grommet to the Right until finished.
Pull all canvas lacing tight,
Adjust lacing to center the canvas in the frame side-to-side and fore-and-aft,
Pull all canvas lacing tight, but do NOT over-tighten!
The canvas should have a snug fit
with the edge having a smooth straight appearance.
Do not over-tighten to the point of "smiley's" between grommets
(this may void your warranty),
Loop the "tag ends" through the last eyelet at each end 2 or 3 times,
Tie the ends in a bow, then tie the loops of the bow in a square knot,
Cut the loose "tag ends" of the lacing to about 3" and burn the ends to prevent unravelling.
Weave these "tag ends" into the lacing for a finished look.
Square Lacing shown on Shadow™ Folding T-Top
Install Flats-Top™ (45-60 minutes):
Find centerline of poling platform (on underside),
Mark line parallel to this 1/2 the width of the rear legs,
Slide Flats-Top™ into the (2) Mounting Brackets and
detrmine location fore/aft for Brackets,
Locate, mark and drill (2) 5/16" holes for the rear Mounting Bracket holes,
Mount Mount Bracket to bottom of poling platform with rear mounting holes only,
Slide Flats-Top™ into the (2) Mounting Brackets,
Align, locate, mark and drill (2) 5/16" holes for the front Mounting Bracket holes,
Install front Mounting Bracket 5/6-18 screws through washers,
Verifying your Boat:Hull Identification Numbers (HIN) AFTER Aug 01, 1984 ...
Hull Identification Numbers (HIN) BEFORE Aug 01, 1984 ...
Each of our boat manufacturers' canvas pages
have Photos of the Factory OEM T-Tops, Hard-Top, Bimini-Tops, Canvas, etc. at the
bottom of the page for verification
(Sea Hunt® Photos for example).
Please compare your boat against these photos to insure you have the
Original-Equipment (OEM) Top frame from the Factory
(some dealers, like Chatlee in NC and Ed's Marine Superstoe in VA,
for example,
install their own, after-market T-Tops).
Our Factory OEM canvas
does not fit after-market Tops!
Boston Whaler®, Sea Ray® and Grady White® do NOT allow
dealers to install their own, after-market tops on new boats,
so these are typically Factory OEM,
unless an owner installed their own top.
We sell at a discount (and without 6-12% Sales Tax) versus the local dealers
since we "make-to-order" (Just-In-Time = JIT)
using our inventory of 1,000's of patterns
(no need to carry inventory)
and thus our overhead is lower.
Unfortunately, agreements with boat manufacturers prevent us from selling the current (last 2 model years)
factory-original (OEM) production canvas, frames and covers direct to the public.
Some photos show optional items mounted on standard products.
Descriptive, typographical or photographical errors are subject to correction.
18.119.105.239 ,
Install your Flats-Top in an hour
How to install your Flats-Top
Its easy to install your Flats-Top
Ontario British Columbia BC Alberta Newfoundland Saskatchewan Manitoba Quebec New Brunswick Novia Scotia Labrador
ALABAMA AL ARIZONA AZ ARKANSAS AR CALIFORNIA CA COLORADO CO CONNECTICUT CT
DELAWARE DE DISTRICT OF COLUMBIA DC FLORIDA FL GEORGIA GA
IDAHO ID ILLINOIS IL INDIANA IN IOWA IA KANSAS KS KENTUCKY KY LOUISIANA LA
MAINE ME MARYLAND MD MASSACHUSETTS MA MICHIGAN MI
MINNESOTA MN MISSISSIPPI MS MISSOURI MO MONTANA MT
NEBRASKA NE NEVADA NV NEW HAMPSHIRE NH NEW JERSEY NJ
NEW MEXICO NM NEW YORK NY NORTH CAROLINA NC NORTH DAKOTA ND
OHIO OH OKLAHOMA OK OREGON OR PENNSYLVANIA PA
RHODE ISLAND RI SOUTH CAROLINA SC SOUTH DAKOTA SD
TENNESSEE TN TEXAS TX UTAH UT VERMONT VT VIRGINIA VA
WASHINGTON WA WEST VIRGINIA WV WISCONSIN WI WYOMING WY
How to lace canvas on your T-Top
Lace canvas on top
Lace canvas on T-top
Lace canvas on Shadow
Lace Sunbrella on T-Top
Lace Sunbrella on Shadow T-Top
Lace a boat T-top cover
Lacing canvas on top
Lacing canvas on T-top
Lacing canvas on Shadow
Lacing Sunbrella on T-Top
Lacing Sunbrella on Shadow T-Top
Lacing a boat T-top cover
Lace the Canvas (30-40 minutes):
If the top is off the boat, position the top so you can reach both sides easily,
by positioning the top:
hanging in the air vertically from one end or a side,
in place on the boat (working over your head can be tiring however), or
with the end of the top on a table so you can reach underneath.
Attach the canvas loosely using 6 to 8 "zip-ties" pulled through
grommets near the corners and around frame.
Once lined up, tighten, but not too tight.
Start in the center at the front (if possible)
(Front/Middle on most T-Tops, T-Topless™, Montauk-T-Topless™ & Flats-Top™;
Rear/Middle on the Shadow™ & Montauk-Shadow™),
You want to end up with the lacing running under the canvas
between grommets in order to turn the edges of the canvas down to shed water,
Lace the canvas to the frame
(important to reverse over/under from left to right side to avoid kinking):
Lace to the Left:
Start lacing through the TOP of 1st grommet,
Run lacing under canvas and up through the next grommet to the Left,
Run lacing UNDER frame tubing and OVER the top of the frame tubing,
Run lacing back through the TOP of same grommet,
Repeat at the next grommet to the Left until finished,
Lace to the Right (reverse under/over bar sequence):
Start lacing through the TOP of 1st grommet at the center,
Run lacing under canvas and up through the next grommet to the Right,
Run lacing OVER frame tubing and UNDER the top of the frame tubing,
Run lacing back through the TOP of same grommet,
Repeat at the next grommet to the Right until finished.
Pull all canvas lacing tight,
Adjust lacing to center the canvas in the frame side-to-side and fore-and-aft,
Pull all canvas lacing tight, but do NOT over-tighten!
The canvas should have a snug fit
with the edge having a smooth straight appearance.
Do not over-tighten to the point of "smiley's" between grommets
(this may void your warranty),
Loop the "tag ends" through the last eyelet at each end 2 or 3 times,
Tie the ends in a bow, then tie the loops of the bow in a square knot,
Cut the loose "tag ends" of the lacing to about 3" and burn the ends to prevent unravelling.
Weave these "tag ends" into the lacing for a finished look.
Verifying your Boat:Hull Identification Numbers (HIN) AFTER Aug 01, 1984 ...
Hull Identification Numbers (HIN) BEFORE Aug 01, 1984 ...
Each of our boat manufacturers' canvas pages
have Photos of the Factory OEM T-Tops, Hard-Top, Bimini-Tops, Canvas, etc. at the
bottom of the page for verification
(Sea Hunt® Photos for example).
Please compare your boat against these photos to insure you have the
Original-Equipment (OEM) Top frame from the Factory
(some dealers, like Chatlee in NC and Ed's Marine Superstoe in VA,
for example,
install their own, after-market T-Tops).
Our Factory OEM canvas
does not fit after-market Tops!
Boston Whaler®, Sea Ray® and Grady White® do NOT allow
dealers to install their own, after-market tops on new boats,
so these are typically Factory OEM,
unless an owner installed their own top.
We sell at a discount (and without 6-12% Sales Tax) versus the local dealers
since we "make-to-order" (Just-In-Time = JIT)
using our inventory of 1,000's of patterns
(no need to carry inventory)
and thus our overhead is lower.
Unfortunately, agreements with boat manufacturers prevent us from selling the current (last 2 model years)
factory-original (OEM) production canvas, frames and covers direct to the public.
Some photos show optional items mounted on standard products.
Descriptive, typographical or photographical errors are subject to correction.
18.119.105.239 ,
Lace your T-Top Canvas
Lace Replacement T-Top Canvas
Lacing your T-Top Canvas
Lacing Replacement T-Top Canvas
Ontario British Columbia BC Alberta Newfoundland Saskatchewan Manitoba Quebec New Brunswick Novia Scotia Labrador
ALABAMA AL ARIZONA AZ ARKANSAS AR CALIFORNIA CA COLORADO CO CONNECTICUT CT
DELAWARE DE DISTRICT OF COLUMBIA DC FLORIDA FL GEORGIA GA
IDAHO ID ILLINOIS IL INDIANA IN IOWA IA KANSAS KS KENTUCKY KY LOUISIANA LA
MAINE ME MARYLAND MD MASSACHUSETTS MA MICHIGAN MI
MINNESOTA MN MISSISSIPPI MS MISSOURI MO MONTANA MT
NEBRASKA NE NEVADA NV NEW HAMPSHIRE NH NEW JERSEY NJ
NEW MEXICO NM NEW YORK NY NORTH CAROLINA NC NORTH DAKOTA ND
OHIO OH OKLAHOMA OK OREGON OR PENNSYLVANIA PA
RHODE ISLAND RI SOUTH CAROLINA SC SOUTH DAKOTA SD
TENNESSEE TN TEXAS TX UTAH UT VERMONT VT VIRGINIA VA
WASHINGTON WA WEST VIRGINIA WV WISCONSIN WI WYOMING WY
Your Sunbrella®, Weblon® or Stamoid® canvas will NOT shrink ...
In the past canvas was often made of cotton or poly/cotton "Duck" fabric
which would shrink over time.
All of the canvas we sell is dimensionally stable and does not shrink.
Sunbrella®, in fact,
will stretch a very slight amount over time,
so it is important to install it as tightly as possible.
There is no need to leave the canvas loose to account for future shrinking.
Replacing Existing Canvas (No Snaps in Canvas OR Snaps already in place on T-Top)
If you are replacing existing canvas and have snaps installed on the T-Top frame,
it is advisable to install the snaps in the canvas yourself for perfect alignment.
We install (or provide) 5/8" OD Nickel Plated Brass snaps with a 1/4" barrel.
Installing snaps yourself will require a snap installation tool.
We offer a tool, and recommend the tools below.
New Canvas Installation (NO Snaps on T-Top) :
If you are installing canvas on the T-Top for the first time,
there will probably be no snaps installed on the T-Top frame.
To install Male Snap-Screws on the T-Top's aluminum frame,
you will need to carefully:
align (see installation steps below),
mark (use a sharp pencil and double-check),
drill (sharp 7/64" bit, confirm before drilling),
apply Tef-Gel® sealant (to prevent galvanic corrosion) and
install (screw in with medium size Phillips screwdriver) the
Stainless Steel Male Snap-Screws in these holes.
T-Top Spray-Shield Installation Steps:
Click the drawing at right for a larger view,
PRO Tip:
If the canvas is stiff or wrinkled from storage or shipping,
allow it to "Relax" in a warm place before installation,
Keep the front window zipped closed during installation,
Start installing the canvas from the
Center->Out and Top->Down at the Corners First :
Locate the True-Center of the T-Top Tower
(and the canvas)
by measuring
Outside-to-Outside along the front of the
T-Top Tower (and the canvas):
at the top,
as well as at the level (waist level)
where the bottom of ths spray-shield will mount,
Hold the canvas centered at the top,
wrap the the Side "Wing" panels around the T-Top Tower frame
and then check that everything
lines up on the top, bottom and sides.
Carefully mark and install the Top/Center Snap(s)
labelled [A1] in the picture at right,
Mark and install the Bottom/Center Snap(s)
labelled [A2] in the picture at right,
With the canvas snapped to the frame using
snaps [A1] and [A2],
wrap the side "Wings" around the T-Top Tower and affix Velcro around the top
of the T-Top pipe [B],
Pull the Right side of the Front Panel tight by pulling
Up and Out at top [C1] and
Down and Around frame at Bottom [C2], then install Snaps:
at Top/Front corner At [C1] and
at Bottom/Front corner [C2],
Repeat step C (C1 and C2) above for the Left side of the front panel,
Pull the Right Side "Wing" panel tight by pulling
Up and Back at Top [D1] and
Down and Back at Bottom [D2], then install Snaps:
at Top/Rear corner [D1] and
at Bottom/Rear corner [D2],
Repeat step D (D1 and D2) above for the Left Side "Wing" panel,
With the front and side panels pulled "snug" tight,
mark and install the remaining snaps
(between the corner snaps installed above)
at the top, sides and bottom.
Note: A Snap Installation Tool is only required for
canvas provided without the snaps installed ...
How to install snaps on canvas
Canvas Snap Installation Tool Options :
Time Saver™ Button (snap) Fastening kit - Vice Plier Attachments
... $5 to $40
Great Lakes™
Snap Installation Tool
... $56.82 , We are not selling this online as of 2024
Complete Vice Plier with installation dies welded to frame,
Useful for installing many snaps,
Simply align the snap, create small hole with ice pick or awl,
put snap in place and
crimp with tool,
This tool is the same concept as simply adding the "Time Saver" snap die attachments
above to your own vice grips,
except these dies are welded to the vice grips here,
Installation of Lift-The-DOT® fasteners is a bit more manual than installing other fasteners.
Holes can be cut with a razor blade and then the prongs can be folded over with the Prong Bending Tool
for Lift-the-DOT® fasteners (#120445) or a screwdriver.
Special hole cutters and other tools make installation much easier.
These tools are available from SailRite:
Lift-The-DOT® Hand Punch (#100972) cuts holes for 2-Prong Studs.
Lift-The-DOT® Hole Cutter (#110012) cuts the center hole and slits for Lift-The-DOT® Sockets.
Lift-The-DOT® Deluxe Hand Punch (#100695) cuts the center hole and slits for the socket in one squeeze.
Pres-N-Snap® Tool (#109011) with additional die set (#106397) installs the Eyelet-Type Base Stud only.
Verifying your Boat:Hull Identification Numbers (HIN) AFTER Aug 01, 1984 ...
Hull Identification Numbers (HIN) BEFORE Aug 01, 1984 ...
Each of our boat manufacturers' canvas pages
have Photos of the Factory OEM T-Tops, Hard-Top, Bimini-Tops, Canvas, etc. at the
bottom of the page for verification
(Sea Hunt® Photos for example).
Please compare your boat against these photos to insure you have the
Original-Equipment (OEM) Top frame from the Factory
(some dealers, like Chatlee in NC and Ed's Marine Superstoe in VA,
for example,
install their own, after-market T-Tops).
Our Factory OEM canvas
does not fit after-market Tops!
Boston Whaler®, Sea Ray® and Grady White® do NOT allow
dealers to install their own, after-market tops on new boats,
so these are typically Factory OEM,
unless an owner installed their own top.
We sell at a discount (and without 6-12% Sales Tax) versus the local dealers
since we "make-to-order" (Just-In-Time = JIT)
using our inventory of 1,000's of patterns
(no need to carry inventory)
and thus our overhead is lower.
Unfortunately, agreements with boat manufacturers prevent us from selling the current (last 2 model years)
factory-original (OEM) production canvas, frames and covers direct to the public.
Some photos show optional items mounted on standard products.
Descriptive, typographical or photographical errors are subject to correction.
18.119.105.239 ,
Lace your T-Top Canvas
Lace Replacement T-Top Canvas
Lacing your T-Top Canvas
Lacing Replacement T-Top Canvas
Ontario British Columbia BC Alberta Newfoundland Saskatchewan Manitoba Quebec New Brunswick Novia Scotia Labrador
ALABAMA AL ARIZONA AZ ARKANSAS AR CALIFORNIA CA COLORADO CO CONNECTICUT CT
DELAWARE DE DISTRICT OF COLUMBIA DC FLORIDA FL GEORGIA GA
IDAHO ID ILLINOIS IL INDIANA IN IOWA IA KANSAS KS KENTUCKY KY LOUISIANA LA
MAINE ME MARYLAND MD MASSACHUSETTS MA MICHIGAN MI
MINNESOTA MN MISSISSIPPI MS MISSOURI MO MONTANA MT
NEBRASKA NE NEVADA NV NEW HAMPSHIRE NH NEW JERSEY NJ
NEW MEXICO NM NEW YORK NY NORTH CAROLINA NC NORTH DAKOTA ND
OHIO OH OKLAHOMA OK OREGON OR PENNSYLVANIA PA
RHODE ISLAND RI SOUTH CAROLINA SC SOUTH DAKOTA SD
TENNESSEE TN TEXAS TX UTAH UT VERMONT VT VIRGINIA VA
WASHINGTON WA WEST VIRGINIA WV WISCONSIN WI WYOMING WY
Verifying your Boat:Hull Identification Numbers (HIN) AFTER Aug 01, 1984 ...
Hull Identification Numbers (HIN) BEFORE Aug 01, 1984 ...
Each of our boat manufacturers' canvas pages
have Photos of the Factory OEM T-Tops, Hard-Top, Bimini-Tops, Canvas, etc. at the
bottom of the page for verification
(Sea Hunt® Photos for example).
Please compare your boat against these photos to insure you have the
Original-Equipment (OEM) Top frame from the Factory
(some dealers, like Chatlee in NC and Ed's Marine Superstoe in VA,
for example,
install their own, after-market T-Tops).
Our Factory OEM canvas
does not fit after-market Tops!
Boston Whaler®, Sea Ray® and Grady White® do NOT allow
dealers to install their own, after-market tops on new boats,
so these are typically Factory OEM,
unless an owner installed their own top.
We sell at a discount (and without 6-12% Sales Tax) versus the local dealers
since we "make-to-order" (Just-In-Time = JIT)
using our inventory of 1,000's of patterns
(no need to carry inventory)
and thus our overhead is lower.
Unfortunately, agreements with boat manufacturers prevent us from selling the current (last 2 model years)
factory-original (OEM) production canvas, frames and covers direct to the public.
Some photos show optional items mounted on standard products.
Descriptive, typographical or photographical errors are subject to correction.
18.119.105.239 ,
Lace your T-Top Canvas
Lace Replacement T-Top Canvas
Lacing your T-Top Canvas
Lacing Replacement T-Top Canvas


